

Steel components are used in various areas of application, such as in the automotive and railroad industries, and often fulfill safety-critical aspects. Advantageously adjusted residual stress states and mechanical-technological material properties such as hardness and strength as well as freedom from defects such as production or operational cracks are indispensable criteria for industrial quality assurance and condition assessment of steel components. However, destructive testing can only be used here on a random basis. The nondestructive determination of quality-relevant mechanical-technological material and product properties therefore not only serves economic efficiency and resource efficiency, but also safety by enabling quality assurance of the entire product and recurring condition monitoring.
In this respect, micromagnetic material characterization deals with the nondestructive determination of material properties and stress states of ferromagnetic steels and cast iron. The functionality of micromagnetic techniques is based on the fact that the microstructure and its stress states give a ferromagnetic material its mechanical properties on the one hand and significantly influence its magnetization behaviour on the other. The 3MA method (Micromagnetic Multiparameter Microstructure and Stress Analysis) developed at the Fraunhofer IZFP uses various interaction mechanisms to draw conclusions about mechanical-technological material properties from nondestructively measurable micromagnetic parameters and is already proving its efficiency on a large industrial scale. In addition to micromagnetic interaction mechanisms, magnetic flux leakage distributions of magnetized material surfaces also reveal quality-relevant characteristics in that locally increased magnetic flux densities form at surface-near irregularities such as cracks or inclusions of air or slag. Magnetic particle testing is based on this phenomenon and is widely used in industry, but has resource and process-related disadvantages. With the increasing digitalization of industrial processes, sensor-based flux leakage technology is of interest for quality assurance and condition assessment.
In both cases – micromagnetics and flux leakage technology – a spatially resolved image or investigation of surfaces is of great interest. While probe-based stray flux testing requires knowledge of the local distribution of magnetic stray fields in imaging form, this is not a basic requirement in micromagnetics and has so far only been possible at high cost. The number of manufacturing and stressing processes that achieve locally defined inhomogeneous property distributions is increasing (e. g. laser hardening, inductive hardening). In addition, there are processes that can generate local anomalies in the event of a fault. The corresponding quality assurance basically requires the examination of many discrete positions up to full-field imaging. In order to achieve a spatial resolution with both probe-based flux leakage techniques and micromagnetic testing methods, ferromagnetic component surfaces must be measured point by point (rastered) using appropriate sensors with the aid of manipulator systems. In practice, it is a disadvantage that the speed of such systems with increasing lateral resolution is in the range of several hours due to the number of support points with equally increasing positioning accuracy of the manipulator system and can therefore not be considered inline-capable for 100 % quality assurance. The use of sensor arrays (lines, matrices) makes acceleration possible; however, the dimensions and costs of the array elements considerably limit economic efficiency, especially in the case of micromagnetics.
The approach to be validated in the “VISiMOS“ project should enable detailed imaging and nondestructive testing of material properties and the absence of cracks in just a few seconds.
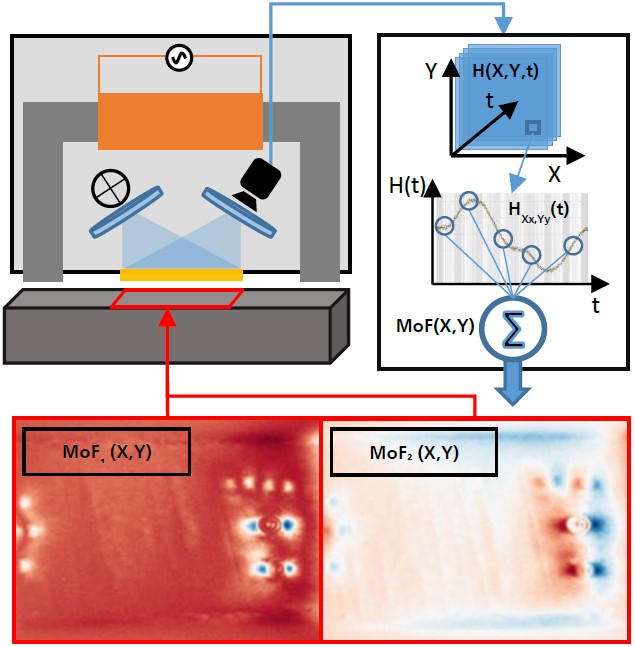
As part of a preliminary scientific project funded by the Federal Ministry of Education and Research (BMBF) (WiVoPro, project “BiWa-MOS“, FKZ:13N15251), it has already been investigated whether magneto-optical image converters can enable both fast and high spatial resolution and imaging material characterization and also offer the possibility of detecting cracks. A magneto-optical sensor based on the Faraday effect was used for this purpose. A digital camera in the sensor records the local distribution of the normal component of the magnetic field strength distribution on the surface of the magneto-optical transducer. During the project, a metrological methodology was developed based on the acquisition and analysis of magneto-optical image data during the cyclic remagnetization of the objects under investigation. On the one hand, micromagnetic features for characterizing mechanical technological material properties were extracted using analysis techniques based on the 3MA method and output in the form of images. In addition, signal and image processing methods were used to achieve the additional possibility of a flux leakage test for high-resolution crack detection. Both aspects were successfully demonstrated.
The innovation aimed for in the “VISiMOS“ project (to be validated) is a magneto-optical sensor that provides quantified images of the local distribution of residual stresses in different operating modes virtually in real time and also detects cracks. This addresses the needs of industrial quality assurance and condition assessment of parts and components made of ferromagnetic steel. By using a high-speed camera, the envisaged sensor system should offer unrivalled speed and spatial resolution for micromagnetic material characterization and condition assessment. The methodology for this is to be further developed in the project in terms of speed and accuracy for the testing of wheelset shafts in the railroad industry and validated for industrial suitability.
 Fraunhofer Institute for Nondestructive Testing IZFP